Saturday 29 June 2013

Going to the Chapel and....

Hi everyone and welcome.  A special welcome to Connie who has just joined the Nomad following.  Hope you are all having a fun and mojo filled Saturday.  The end of the month is looming and as usual there are projects I have been working on, or at least thinking on, that are due for submission.  Luckily the weather is a bit so so, a chance to be in and craft.  The weeds will still be there later.  Or maybe even more weeds!!  You can't tame nature, just bully it a little.....

Over at Cheery Lynn this week it's all about weddings.  This gave me an ideal opportunity to use my art pads from LOTV.  I love these, a bit of a cheat but fab for us what can't colour.  Quick if you are in a hurry and a nice variety of images.  I was also lucky enough to win the weekly candy draw last week so I got myself a set of their brand new Madame tags.  These are so pretty.  I expect they will be appearing all over the place.  Well, all over my place anyway.....


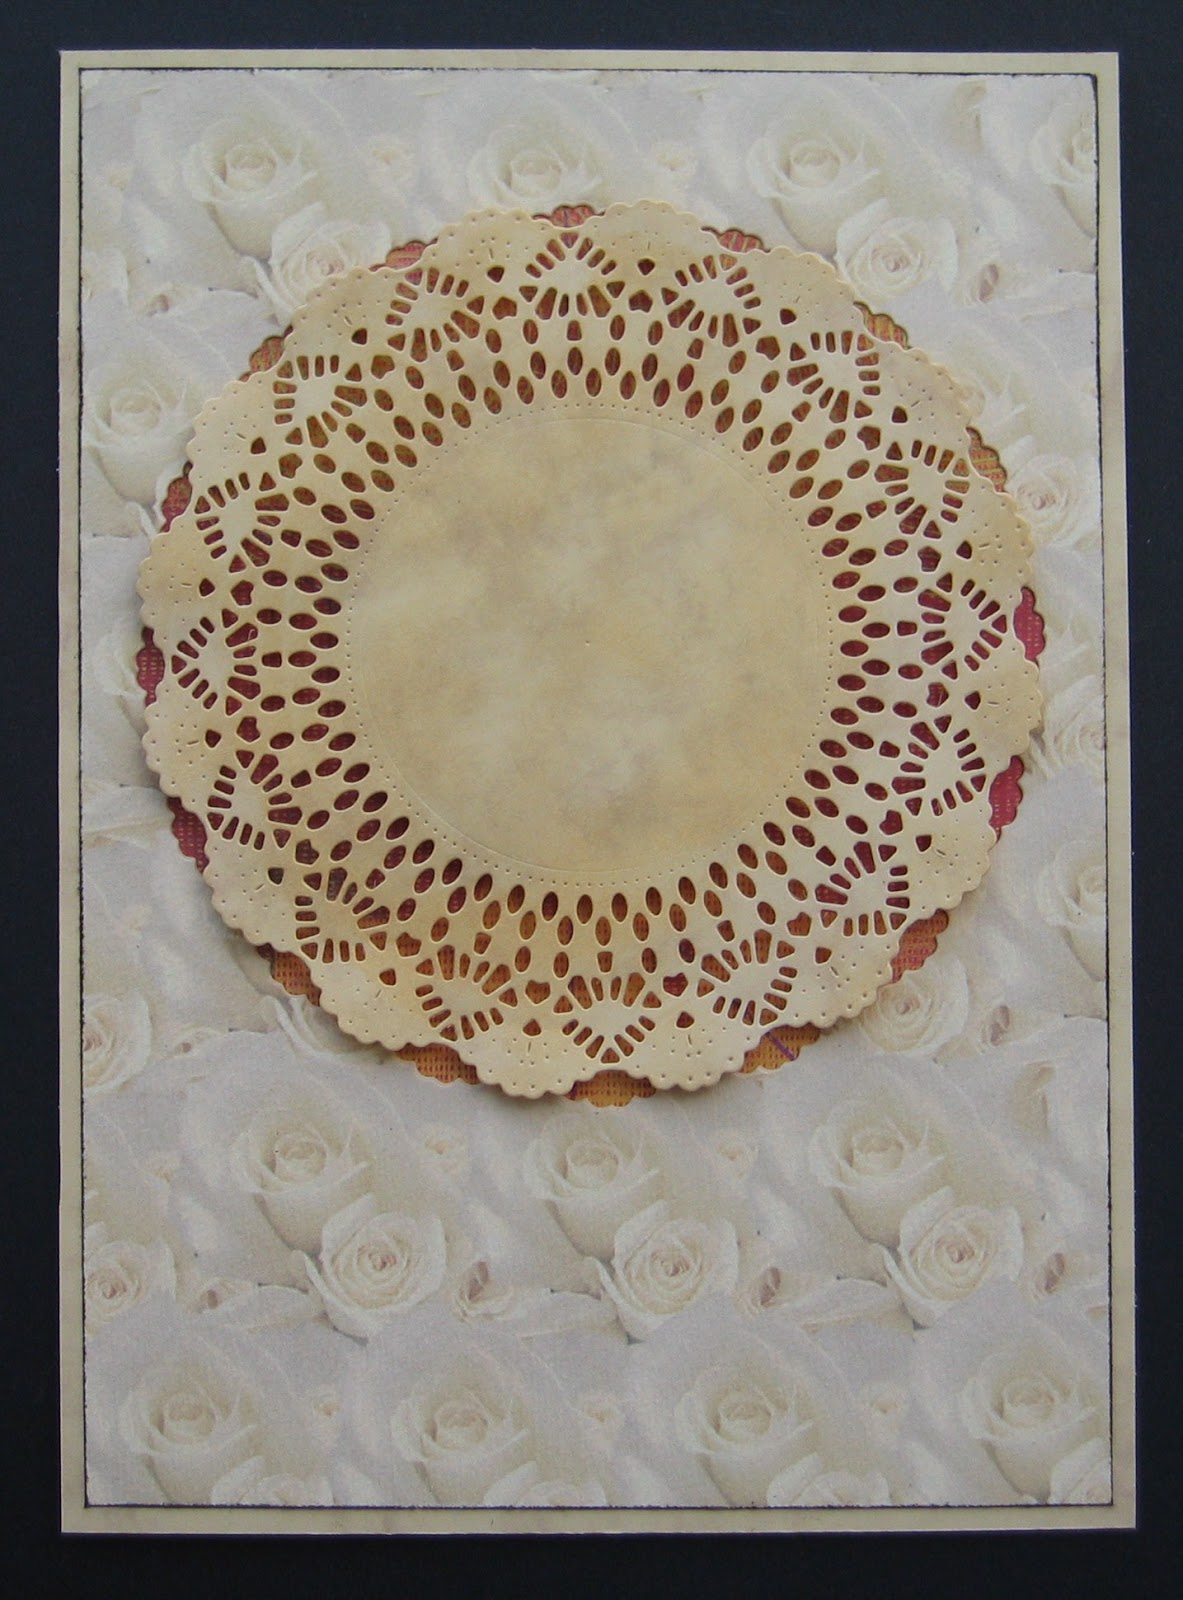
I wanted to go a bit vintage.  Not my strongest style.  Not that I'm sure I have a particular style.  I'm a bit mix and match maybe?  Anyway I found this nice old parchment coloured card and cut a Cheery Lynn English Tea party doily from it.  Then I had this gorgeous rose printed card which I cut the same doily from and matted onto the first card.  I backed the aperture with Basic Grey Colour Me Silly paper COL-389, which is so not vintage but I loved the bright red and orange to lift everything a bit.  Then I mounted the doily cut from the parchment colour card on sticky pads over the aperture, with a slight twist.  


I cut the LOTV Mr & Mrs image from the art pad and added some iridescent glitter to her veil and dress.  I made a double rosette from the rose card and added some die cut and gold embossed flowers using COL-389 from Sizzix Flowers and Vine #3.  The tag is from the LOTV Madame tag set, coloured with DI Walnut Stain and Barn Door.  I used glossy accents on the heart.  I thought the 'With Love' sentiment fitted perfectly.  


A bit of a closer look at the central details. 

Joining the fun at
Cheery Lynn Designs Challenge - Wonderful Weddings
LOTV Challenge - Use a Sentiment
Simon Says Stamps Challenge - Anything Goes
That Craft Place - Flowers
Country View Challenges - Die Cuts

Thanks for dropping by.  Leave me a little love so I know you were here.  It looks like the sun is trying to shine so off to pull a few weeds.  Have a great day everyone.......

Thursday 27 June 2013

Anything? Really?

OMG you have got to try this, seriously, this is such fun.  What, oh yeah!!  Hello followers and friends.  Welcome.  But really, you have got to try this. 

Over at PaperArtsy Darcy is strutting her stuff and WOW.  Go check it out.  She made washi tape.  Yeah, so, I hear you say.  It looks pretty amazing but once you have a go......  I think it needs a government health warning on the chances of addiction.  The world will be covered in home made tape!!


OK, here's my first attempt.  I used, from the top, double sided tape, carpet tape, drafting tape, masking tape.  The double sided and the carpet tape have a layer of tissue applied on one side.  See Darcy's fab tutorial.  Then I painted and stamped.  Hee hee fun art!


This double sided tape is very thin.  Won't use this again.  I like the colours and the bottle from LPC001 looks great but had difficulty getting this off the mat in one piece after painting and stamping. 


The carpet tape is super thick double sided tape and it is excellent for this technique.  These are two of the panels from the carpet tape masterpiece.  Sorry but I just love this.   I painted this tape with dark blue and then brayered on some pale blue.  Then stamped LPC022 modern girl in black.  The brayer wasn't loaded evenly so I got this variation in colour and the white patch is where I got impatient and tried to play before the paint was dry and lifted a thumb load of paint and tissue off the tape. The original plan was to cut it into thin strips after so I had a strip of eyes and a strip of lips but I just love it too much.   Instead I looked around my craft room and decided it had to go above the door.  


Door jam art.  Fantastic.  I think I shall have to make a longer piece so it goes all the way across.  Over at Simon Says it's anything goes.  Really, even door jam art??  Well why not indeed.......


This old drafting tape has almost lost it's sticky but these two stamps from SIDD05 look great on the lilac.


On the masking tape I went orange and stamped a background using the two small stamps from LPC022.  Then I stamped modern girl again in black, thought that was too bold and used red instead.  That gave an almost ghostly effect.  Can you see her??  So cool. 

Thanks Darcy for this inspiration.  Such a fun technique.  I may be inspired to do a little decorating.....

Joining the fun at
PaperArtsy
Simon Says Stamps Challenge - Anything Goes 
Stampotique Designers Challenge 106 - New Adventures (never done this before, it was a great adventure)

Thanks for dropping by.  Do check out Darcy's tutorial.  Have a great day.  Off to make tape.........

Monday 24 June 2013

Jingle Bells

<a href="http://www.bloglovin.com/blog/6624583/?claim=mzmsbasehkb">Follow my blog with Bloglovin</a>

Hi followers and friends.  Please ignore the blurb above.  Something to do with blog lovin'!!  I am switching my blog list to there since google reader keeps disappearing and well......  Too technical for me actually.  If you would like to follow me still then I suggest subscribing by email or click on the blog lovin' follow button which hopefully has appeared in my sidebar. Not sure if I will be able to see who/how many are following then, I haven't been able to work out if people have subscribed by email!!  Maybe someone knows??

Anyway it's the time of the month for Christmas!  I have been joining in the Beat the Christmas Rush Challenge.  This time I was looking through my stash and found some tree aperture cards in green.  Perfect! 
  
Hunting through the stash I found some handmade paper so I tried this black and white stripes in the aperture.  OK, modern xmas tree!  I cut a Sizzix small original tree from some scrap, added some peeloff stickers from Craft Creations and a foiled die cut sentiment.   I'm going to enter this one over at Simon Says Stamp and Show where they are looking for stripes. 

Two more trees, a few beads pretending to be baubles on the first one.  
  A silver variation with just some silver ink smudges.  

Four more cards to add to the Christmas stash.  That's 17 now.  Not too shabby.  

Joining the fun over at

Thanks for dropping by.  Off to do a bit of gardening between the showers.

Sunday 23 June 2013

Zoom Zoom

Welcome again followers and friends to a mojo filled Sunday.  The craft is with us tonight so grab it while you can and craft away good friends.....

Sorry, it's another tag!!  A couple of places were looking for a kraft project.  What a great colour for the blokes so I decided to play with some kraft card, DI Walnut Stain and Barn Door and my Cheery Lynn English Tea Party Doily.  I know, you are all thinking man card, doily??  But I think it works.  See what you think......


So, here it is.  It's a bit of a super size tag, 10 x 17cm.  I wanted to use the English Tea Party Doily so I cut one out of kraft and then I wondered if I could cut the tag top to match??  Don't you love these strange ideas that sometimes pop into the brain cell??  Now at this point I realised that if I had an angel wing for this doily it would be easier, but I don't, so after a bit of fiddling I managed to get it all set with my top cutting plate just covering the bit I wanted cut out.  Sorry, so intrigued by the process forgot to take a picture.  Anyway, I would say it was almost a perfect success.  A little bit of overcut but since I was layering the doily on top, no problem.   I embossed the tag with Sizzix Retro Circles and added some DI.  


I've added DI to the doily as well and the image is from LOTV, a little cheat because I used one of their art books, so no nice comments about how well I coloured it please!!  Well, OK, if you must!!  I think these little books are fab cos they help us non-colouring numpties, they are useful if you are in a hurry and they also let you work out which stamp you are going to use a lot.  I find that the stamps I use the most aren't always the ones I think I will!  The image is mounted on sticky pads.  I thought that gave a bit better impression of zooming......  


The letters are die cut using Sizzix Ida Lou's Flower Box alphabet and a scrap from The Box.  Hurrah, use those scraps!!  I used a wood button at the top and sewed it on with embroidery thread and a butterfly bubble sticker in the middle. 

Joining the fun at
Cheery Lynn Designs Challenge - Kraft
Simon Says Stamp and Show - Kraft
Joanna Sheen Challenge - Fathers Day
Country View Challenges - Die Cuts
A Blog Named Hero -  Tags

Thanks for joining me again.  Have a great evening.

Broken in Transmission

Good morning everyone and a special welcome to my new followers.  Thanks for joining us here at Crafty Nomad.  I have been taggy again!!   Over at PaperArtsy Carol Quance made a fabulous tag book and tags.  Now some of the ladies playing in the challenge have done the whole project!!   Wow and good on you.   I've opted for just one tag Carol style........


I really liked the tag Carol did with the eyes but I didn't have that stamp so I thought I'd try using modern girl from LPC022 collection.  Wow, I'm impressed.  These are such fantastic stamps.  Aren't those eyes great??  I embossed with Stampendous detail black powder.  Great definition.  The lace is cut using a Fiskars border punch.  The base tag is DCWV Far East stack paper.  I love the texture and the gold embossing worked well with this.  Some hand dyed wool and other fibers and voila.....

Joining the fun at
PaperArtsy
A Blog Named Hero

Have a great Sunday everyone.  Thanks for dropping by and all your lovely comments. 

Friday 21 June 2013

Land of the Midnight Crafter

Greetings friends.  Sorry I haven't been around for a few days but the sun has been shining and it's light til..... well, it's light.  We don't get midnight sun as such, being here in the south of Norway, but at the moment midnight is more like dusk and the sun sticks it's beaming face up not too long after.  They keep saying we are going to be getting some serious rain, so I'm weeding and planting like a good un but it remains desert like.  That's dry and dusty rather than Peach Melba......   What do you mean Peach Melba is a double 's'.  Ah well, it is after midnight........

Over at PaperArtsy Carol Quance is back with some amazing projects.  I decided to have a go at a canvas Carol style.  


I started with a 10 x 10cm flat canvas and used texture paste through Crafters Workshop Alpha mask.  This is a new one for me and the first time I have used it.  Very pleased.  Then I splashed around with some red, yellow and orange acrylic to get some summer feeling going on.  Don't you love those hot colours.  I highlighted the letters with silver ink.  I stamped Lady With a Ship on Her Head from LPC001 on white card and cut her out.  I am rubbish at colouring so after a few aborted attempts I decided B&W worked for me.   And for the project of course.  I used another stamp from the same set on  clear shrink plastic and then painted the back with white paint.  A couple of silver charms from Korthobby with a few seed beads and the Lady is ready to set sail.  

You know, or maybe not, that I am not really a sentiment person, but if the shops were open I would have been there spending an obscene amount of money on some witty sentiment stamps or rubdowns.  Alas, or maybe luckily, the stores are all closed so I resorted to one of my favourite saying courtesy of Crafty Individuals Seaside background papers.  The colours were perfect for the scheme as well.  I think I may have to get a black frame for this to really set off those hot summer colours.  

Joining the fun at
PaperArtsy
Korthobby Utfordring - Sommerinspirert 
Stampotique Designers Challenge 105 - Anything But a Card 
Fashionable Stamping Challenges - Something New (new mask)

 It's starting to get light outside, definitely time for bed!  Thanks for dropping by.

Saturday 15 June 2013

Run Rana Rana Run

Good Morning.  It seems such a short time since I was last here.  Ha ha.  Managed some sleep and the magpies didn't put on a 5am show, or if they did I was in snooze land so missed it.  Woke up with a urge to craft and finish this piece I have been working on inspired by France Papillon and the tag pocket she made for her art journal over at PaperArtsy.  I decided to make a tag with a tag pocket to go with a gift I have for a friend. 


I am sure I have inky backgrounds in one of my scraps boxes but decided it was easier to take a clean scrap and just smear on some acrylic.  I stamped Ding Dong Bird from SIDD05 onto white card and added DI Walnut Stain.


I made my pocket as described by France and even the sewing machine was cooperating this morning!!  Wonders never cease.  I used some of the acrylic smear paper as my inner tag and strengthened it with some scrap card.  The torn cotton fabric is stapled on, as per France. 


I decided I wanted a black tag background but thought that might be a bit boring so stamped it with the feather from LPC001 in all shades of acrylic.  Quite impressed with this cool card I have created.  You will see this again me thinks.......

Joining the fun over at
PaperArtsy
Hjerteboden - Vennskap
Bunny Zoe's Crafts - Wings
Fashionable Stamping Challenges - Tag Time 

Just need to do a bit of have a nice day journalling on the inner tag and it's ready to send a happy day greeting to my friend.   But don't tell her!  It's going to be a surprise.  Thanks for dropping by.  Have a great day everyone.......

Brown Cheese and Grass Seed

Hi everyone.  Thanks for joining me again.  It's really late and I should be in bed but I had this idea and thought it wouldn't take long!!  Yeah, right.  Anyway, this is going to be quick.  I think this looks a lot better in real life but then again I am feeling a bit cross eyed at the moment so..........


The base mat is Basic Grey Obscure Blur paper OBS-946.  I then used a cream card layer and die cut some wave detail.  This is actually some of the cloud dies from Do Crafts Build a Scene Vintage Hot Air Balloon set!!  Works for me.  The surfer is from the OBS-946 paper as well.  I have cut him out and mounted him on sticky pads.  As I said, it looks better in real life.  The layering isn't showing up very well in this photo and looking at it again I think I have a big shadow going on.  Probably me in the way.  Sorry about that.  The sentiment is a Crafty Individuals stamp.   Oh yeah, some faux stitching around the edge.  Can't even sew straight faux!!   

Joining the fun at
Basic Grey Challenges - Fun in the Sun used Basic Grey paper OBS-946
Simon Says Stamps - Transport
Papertake Weekly - Hello Boys

Right, that's it for now.  Hope the magpies don't wake me up at 5am again....   Thanks for dropping by.  Have a great weekend everyone.......

Thursday 13 June 2013

Postcard to Piggyfeather

Hello and welcome Nomad followers and friends.  I was speaking to my sister yesterday and she said she hadn't seen any Crafty Nomad for a few days.  I didn't realise that anyone I know in the real world was paying attention.  Better be careful what I say........  She asked was I busy in the garden or with the animals?  Yes, to both.   Although today we have been having some rain so in between showers I have been trying a catch up on the craft.  It hasn't been entirely successful as I haven't been applying my brain cell exclusively to creativity and hence the mojo isn't flowing as well as I had hoped.   What with popping out between showers and also hopping around between a couple of projects and ideas it quite honestly has been a bit of a slow process.  Finally though something to share.....


Over at My Mind's Eye blog there is a colour challenge, kind of green and black and pink and orangy red with stripes and icons and a few other ideas.  So I got out my 29th Street Market Peaceful Dreams Dream Lines/ Relaxing Red paper and Mischievous chipboard elements.  Now the chipboard elements are actually halloweeny ones but I thought they worked with both the colour scheme and the sentiment.  So my base card is the stripes side of the paper matted on to the reverse red side.  I distressed the edges of both layers and added some DI Walnut Stain to make them stand out a bit.  The central motif is one of the chipboard elements, aren't those owls cute!!, mounted on a piece of the same paper which I have cut with Cheery Lynn Spring Flower Burst Doily die.  The buttons and all the letters come from the chipboard elements pack as well.  I cut up a few of the chipboard sentiments to get to Above All Be True as I liked the mix of fonts, styles and colours.  I really hope that come October I won't need Happy Halloween, Trick or Treat or Lil'Spook!!!!  No, surely not......


So basically the whole card came out of one sheet of 12 x 12 and the chippies!  Great coordinating colours on the front and reverse sides of these sheets.   Nice weight and texture as well. 

Joining the fun at
My Minds Eye - June Challenge
Bunny Zoes Crafts - Wings
Simon Says Stamp and Show - Buttons
Country View Challenges - Die Cuts

I thought this might make an unconventional wedding card or a card for a couple.  What do you think??  Thanks for dropping by.  Have a great evening.  I hope the mojo is flowing for you........

Sunday 9 June 2013

Happy Holidays

Hello Nomad Followers and Friends and those maybe joining us for the first time.  Welcome all.  I'm feeling summery.  Hurrah, at last.  The weather is lovely, the garden is blooming, weeds as well but they keep the bunnies happy so we don't complain too much.    Even found time for a little crafting.  Pretty much a perfect day.  I have been working on the Cheery Lynn red, white and blue challenge.  I really wanted to use a rosette, you know, score and fold and squish and doesn't it look beautiful, whilst also incorporating my CLD English Tea Party die.  I had been playing around with scoring and stuff when inspiration fled so I decided to have a look and see what everyone else had been doing.  Now isn't that the weirdest thing!!  Todays post at CLD included a folded doily!!  Crazy but true.  Maybe that was the craft idea that was whizzing around the cosmos today.    Anyway I must thank Holly for the tips that made this work for me, most especially the suggestion to use two doilies to get a complete round.  Thanks Holly.


So here it is.  I cut two Cheery Lynn English Tea Party Doilies from blue card.  This is quite thin card so scoring and folding was easy.  The first doily I cut from the centre to the outside, then scored and folded.  The second one I did all the folding and scoring before cutting.  I think that worked better, less impact on the centre cut.  I overlapped two sections each side when I glued the rosette together, so you can alter the final size a bit if you want.  Then I cut two circles from DCWV Dots and Sunday Afternoon, how appropriate, mat stacks.  Small challenge gluing these to the centre of the rosette solved by using a cotton wool ball!  Then I stuck on a stamped image from Crafty Individuals Seagull Adventure.  I've used sticky pads to raise the seagull up from the card.  The base card was embossed with Sizzix Rays and the red card with Sizzix Checkerboard embossing folders.  I added some ribbon where the cards overlapped.   I used the cotton wool ball trick again to adhere the rosette to the card.  

Quite pleased with this although it's definitely a box envelope for this one. 

Joining the fun at
Cheery Lynn Designs Challenge 83 - Red, White and Blue
Country View Challenges - Diecuts
Joanna Sheen Challenge - Spots and Stripes
Papertake Weekly - Anything Goes
That Craft Place - Independence Day

Thanks for dropping by.  I appreciate the time you take and any comments you leave.  Take care and have a great evening.  Tomorrow is another day......

Saturday 8 June 2013

You're Welcome

Hi everyone and welcome.  Happy days, 8 chicks hatched Wednesday.  So cute.  They have started to step out of the nest and peck around a bit and mother hen is quite keen to be out and about in the big wide world.  She has got up a few times but until all the chicks follow she won't leave them.  Maybe they will venture out today.  It's an OK day, warmish, cloudy, not too much wind.  A perfect day for a first glimpse of the big wide world. 

This little project was going to be a card but somewhere along the way it became a tag!!  Over at PaperArtsy this week Sue Carrington has been showing her stuff and it reminded me that I had some embossing plates that I hadn't played with so.......

I embossing my silver metal using Kabuka 13 plate from Ten Second Studio.   Then I painted it with red and then black acrylic and buffed it to expose the different colours.  I like how the silver is showing through as well.  Then I layered with red, black and gold card.  The stamp is PaperArtsy LPC022.  Love these stamps.  The beaded garland is one I picked up years ago at The Range.

 
I really wanted thin red and black ribbon for the tie but only had this fat red so.........   Maybe I will swap it out later if something more appropriate comes to light.

Joining the fun at
PaperArtsy
Simon Says Stamp and Show - S  Stamping
Papirdokkene - Utfordring 48 Juni
Papertake Weekly - Anything Goes
Pink Gem Challenge 83 - Emboss it

Thanks for dropping by.  Hope you have a great weekend.  Leave a hi so I know you passed by....

Wednesday 5 June 2013

Team Dad

Greetings Nomad followers and friends.  Special hello and welcome to new followers.  So glad you joined us.  So summer is here, the bunnies are bouncing, the chicks are hatching.  I mean, right now, the chicks are hatching.  Very exciting.  There are a lot of men challenges out there at the moment what with Fathers Day just around the corner.  Thought I'd flex my brain cell and try a few man cards.  Never the easiest I find but plenty of inspiration out there so here we go.  Man card number 1


I have done a Shaped card.   I have used the Soccer boy from Panduro's Pojkar set Stamped onto some Scrap card and cut out.  The card idea was inspired by Alby over at Bunny Zoe's Crafts where the challenge is casing a DT member.  I liked the colour, blue of course, and the shape of Alby's card so I used my new Crafts Too Frames 7 set.  I embossed the two pale blue layers with Sizzix Retro Circles and Bricked embossing folders.  Then added some highlights using VersaMagic Night Sky.  The DAD was cut from dark blue card with Sizzix Ducky Wucky but the embossing didn't show up very well so I coloured over using American Crafts blue galaxy marker.  

Joining the fun at
Bunny Zoes Crafts - Casing Alby's card
That Craft Place - Dies and Punches
The Artistic Stamper - Makes for Men
Papertake Weekly - Anything goes/shaped card
Country View Challenges - Die Cuts
Simon Says Stamp and Show - S Shaped card/Stamping/Soccer
Simon Says Stamps Challenge - Masculine/Fathers Day

Ooh, having a bit of a link frenzy.  Ah well might get lucky.  It's always nice to win even if it is just good old Mr Random doing the honours.   Was very happy today when Mr Random picked me over at the Stampotique Designers Challenge.  Now there's some very illustrious company over there so very happy to be a winner.  I can stock up on a few of their delicious stamps now.  Happy Dance.  

Thanks for dropping by.  All comments gratefully received.  Off to feed the hungry ones and see if I can hear any peeps.  Or something like that.........

Sunday 2 June 2013

Out of the Armchair...

Hi everyone.  This is quick cos I have been working on a project that is so out of my comfort zone.  Fabric and sewing machines.  Of course it started well but then the sewing machine, we have a love hate relationship, decided enough was enough and no, I couldn't attach 6 panels, only two, or I'll eat your project.  Improvise, improvise and posting down to the wire.  

It's all Darcy's fault!!  She made a bag over at PaperArtsy this week and it got the little grey cell going and this is what happened after the inspiration struck....


I had a white cotton bag so I opened it up and smeared it with DI Barn Door, Dusty Concord and Picked Raspberry.  These three worked for me on my tag....  I was going to try acrylic but.....   Maybe next time.   I stamped the small round from PaperArtsy LPC022 in black all over.

I stamped the girl from LPC022 onto some patterned Ikea fabric and ripped and frayed the panels.  As said earlier I made 6 of these and was going to decorate front and back but the sewing machine refused after helping me out with these two so....   I dug out the beaded ribbon and put that on and stuck on some beads.  The sewing machine did agree to re-hem my bag, go figure!  A bit of ribbon in the top and, I know, it looks nothing like Darcy's, but.....

Now I have a lovely little bag to fill with dingsens.  Not sure how the DI would take to washing, if I ever needed to!

Joining the fun at
PaperArtsy
Simon Says Samps - Anything Goes


Thanks for dropping by and all your wonderful comments.  I really appreciate the time you take to visit.  Have a great day everyone.

Saturday 1 June 2013

Modern Oriental

Hello Nomad friends.  Glad you could join me.  The weekend and the witching hour are almost upon us.  What better time to practice the craft.......

Over at PaperArtsy this week the guest designer is Darcy Wilkinson and quite honestly her projects are lovely, but also a little daunting.  A lot of stuff outside my normal comfort zone.  Her last project was fantastic, a house of books.  Definitely a lot of ideas I want to try but where to start?  Luckily the suggestion was made to try a single element and I have made a Darcy style tag.  Yep, back to the tags again.  Not sure what to do with all these tags.  I did tie one on a present for my sister the other day.  Maybe I should have a tag swap.  What do you think??

As suggested by Darcy, swipe your tag through three inks spritzed with water, I used DI Barn Door, Picked Raspberry and Dusty Concord.  Emboss the inky tag, I used Sizzix Rays.  Add some black and white and coloured stamped images.  These are from PaperArtsy LPC022.

I really love this stamp set.  A fantastic mix of traditional and modern images.   A bit of ripped preprinted cotton to finish.  See, quite easy really. 

Joining the fun at
PaperArtsy
Simon Says Stamps Challenge - Anything Goes

Thanks for dropping by.